Cats, Cooking, and Life!
Showing posts with label baking. Show all posts

Date Squares


Here's a traditional and fancy treat that's got some goodness in it. While it's definitely not health food, it's not as sweet as more common desserts plus there's some fibre content. We never seem to get enough fibre these days.

Date squares are typically served as a fancy treat for Sunday tea, special occasions, and important guests. Elegant and delicious, they have wide appeal. Everyone likes to get the many crumbs left in the baking dish. And, of course, it's hard to find a traditional bake sale without them.

This recipe has been handed down from the Admiral Catnap (retired) (and at least one generation before her). I think you'll find the results are as good as any you've ever tried.

You may be tempted to change the order of these directions by cooking the dates first, but please don't. It's much easier to spread the warm date mixture on the crust than after it has cooled.

Equipment note: If you have a pastry cutter, here's a good chance to use it. If no cutter, then use two table knives in a scissor motion to cut the butter into the flour. Very similar to a pie pastry recipe.

Date note: The Admiral recommends Jaffa dates as they result in a smooth paste that easy to spread when cooked. Jaffa is a city on the eastern shore of the Mediterranean.

The following recipe makes enough for a 20 x 20 cm pan (9 x 9 in) pan. These pictures show a 20 x 30 cm (9 x 13 in) pan, and we increased the ingredients by 50%.


Ingredients

Crusts:
  • 200 g flour, all purpose (1 1/2 cups)
  • 3 ml baking soda (1/2 tsp)
  • 5 ml baking powder (1 tsp)
  • 2 ml salt (1/4 tsp)
  • 250 ml butter (1 cup)
  • 250 ml brown sugar (1 cup)
  • 375 ml rolled oats (1 1/2 cup)
 Date filling:
  • 500 ml chopped dates (2 cups)
  • 60 ml cold water (1/4 cup)
  • 30 ml brown sugar (2 tbsp)
  • 15 ml lemon juice (1 tbsp)
  • 30 ml orange juice (2 tbsp)
  • grated zest from an orange

Instructions

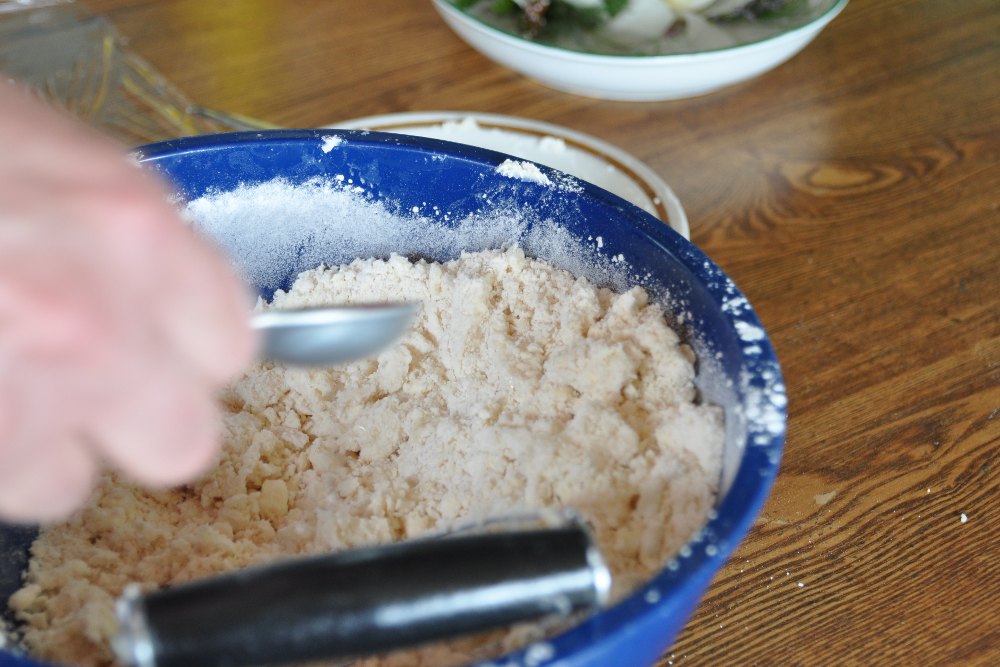
Cutting in the butter


Combine flour, baking powder, baking soda and salt. Cut in butter until mixture is crumbly. Add sugar and oats. Mix well.


After adding the oats

Spread half the crumbs in a greased, shallow, 9-inch square pan. Pat and press the crumbs until firm and smooth.

Pressing the crust using a small bowl

Chopping dates after removing pits
Ready to cook

Cook the dates, water, orange rind and sugar in a small saucepan over moderate heat until thick and smooth. Remove from heat and add fruit juices. Mix well. Spread the date mixture over the bottom layer of the crumbs.

Cooked and smooth

Spread on bottom crust

Top the date mixture with the other half of the crumbs.  Again, pat and press the crumbs until firm and smooth.


Ready to bake

Bake at 180 C (325 F) for 35-40 minutes until the top is lightly browned. Cut squares while still hot and allow to cool while in pan.


Cut and cooled

Does Bowtie Calico approve? Yes, with a lick of her lips.


Bow-Tie Calico Approves!

Pumpkin Chiffon Pie

Pumpkin Chiffon Pie

Another month, another pie. And another seasonal one as well. Pumpkin, that fall classic, is as much as home at Thanksgiving as it is at Halloween. Or, for that matter, at any other time when pumpkin is available. No need to wait for a special occasion. We didn't.

Pie pumpkins, as they're called, show up everywhere these days, at least here in North America, and are very easy to turn into the smooth-textured, orange and tasty ingredient that makes you feel so much more confident in your pie than the canned version. According to most sources I've heard from, you can't even count on the canned pumpkin containing real pumpkin. That's not to say that they're no good for pies; of course they are. But saying "pumpkin pie" sounds so much better that "squash pie."

You could use the jack-o-lantern pumpkins for pie, but they're not as sweet, and are stringier in texture. So make it easy on yourself and get a pie pumpkin.

A little bit of a twist on traditional pumpkin pie, we opted for chiffon. That's a fancy way of saying it's fluffy from incorporating beaten egg whites. Sort of like an angel cake is fluffy.

What follows is a multi-stage preparation to produce the pie. None of it is difficult, but it does take a bit of time. Luckily, you can do everything ahead of serving time, and when it's time to serve, you simply take it out of the refrigerator, top with whipped cream and serve! That makes it the ideal finale for any meal where you want to impress.


Part 1: Prepare the Pumpkin

Using the pie recipe below, we found that one average pie pumpkin, 25 to 30 cm, is enough for about 3 pies. So you may want to make more pies and freeze them, or simply freeze the extra pumpkin for later use. Pumpkin is also good for spice bread, muffins and lots of other treats. Here's how to prepare it. You'll need a steamer, or a large bowl for the microwave.


Cut open

  1. Wash and gently scrub the pumpkin in cold or warm water. Don't use soap.
  2. Using a sharp knife, cut the pumpkin in half. 
  3. Remove the stringy insides with a spoon. Save the seeds, if desired, to roast them as described below. 
  4. Remove the stem and cut the remaining pumpkin into pieces to fit into your steamer or bowl. 
  5. Cooking with a Steamer method: Boil enough water and cook the pumpkin for 20 minutes. 
  6. Cooking with a Microwave method: Put water in the bottom of the bowl, add the pumpkin and microwave it for about 20 minutes. You'll need to periodically stir or re-arrange the pieces for even cooking. Watch the water doesn't boil over. 
  7. The pumpkin is cooked when it is soft for a fork. 
  8. Remove the outer skin using a sharp knife. 
  9. Place the remaining pumpkin in a food processor or bowl. Puree or mash it. At this point you may make your pie, or freeze the unused portion in an airtight container.


Scooping the inside


In the steamer


Removing the skin


Puree in a mixer


Part 2: Pumpkin Seeds

If you like pumpkin seeds, you can roast them. We think they taste good but are too small and much work so don't always make them. One pumpkin does not provide many seeds but they're tasty.

  1. Remove the seeds from the stringy parts of the pumpkin 
  2. Wash the seeds. The best way I found is to put them in a bowl of water and rub them with your hands. The seeds float and the pumpkin "strings" sink. 
  3. Place the seeds on a cookie sheet or other oven pan. 
  4. Optionally season the seeds with melted butter combined with garlic, lemon, green herbs like dried basil or just about anything else you like. 
  5. Place the pan in a low oven 150 C (275 F) for about 20 minutes more or less, depending on how wet the seeds were. You should stir them every 5 minutes to make sure they are evenly cooked. Be sure to watch them closely as they can burn easily. They are done when they are dried and slightly brown. 
  6. Cool 
  7. Enjoy. Crack the shell and eat the insides.

Ready to bako

Ready to eat


Part 3: Pumpkin Chiffon Pie 

 Here are the ingredients for one pie. You'll need a baked pie shell, about 25 cm (9 in). Please look at our pastry recipe for Rhubarb-Strawberry pie, or make your own, or purchase one. But you'll only need a single crust.

For this recipe, you'll need a double boiler. Or do as we did and use two pots, one to fit inside the other.

 Ingredients:

  • 1 envelope unflavoured gelatin (7 g or 1 Tbsp) 
  • 125 ml cold water (1/2 cup) 
  • 4 eggs, separated 250 ml evaporated milk (1 cup) 
  • 250 ml pumpkin, either prepared as above or canned (1 cup)
  • 180 ml brown sugar (or white sugar if you prefer) (3/4 cup) 
  • 2 ml salt (1/2 tsp) 2 ml nutmeg (1/2 tsp) 
  • 2 ml ground cinnamon (1/2 tsp) 
  • 1 ml ground ginger (1/4 tsp) 
  • 250 ml whipping cream, whipped (1 cup)


 Instructions:

  1. Dissolve gelatin in cold water. Set aside to soften. 
  2. In double boiler heat the egg yolks, milk, pumpkin, 1/2 cup brown sugar and spices. Cook, stirring for 10 minutes. 
  3. Remove the mixture from heat, add gelatin, stirring until dissolved. Refrigerate until it's thick. It needs to be thick to combine with the egg whites in the next step. Otherwise the egg whites will float to the top. 
  4. Beat egg whites until stiff. Fold into pumpkin mixture. 
  5. Pour into the pie shell and refrigerate until ready to serve. 
  6. Whip the cream and give everyone a spoonful on their slice (the size of the spoon is open to interpretation).


Whipping the egg whites


Our makeshift double boiler


Baked crust


And enjoy!

After refrigeration


We know Bow-Tie Calico did!


Approve!


Peach Pie


What it is about pies? We've made 3 in the past 3 months. And in the five years before that? None. Anyway, pies are best with fresh fruit and summer wins that category.

This time, it's peach pie. At a nearby farmers' market, a local peach grower had some great-looking organic peaches, so we bought a couple of boxes for eight dollars. I was surprised to learn a local peach grower existed as I didn't think the local climate was suitable.


In any case, the peaches were firm, ripe, a little lighter in colour and somewhat smaller than our typical supermarket peaches. We made sure to sample one before starting the pie to find out how sweet they were. Turns out they were about medium sweet and tasted good. Once we adjusted the sugar in the recipe, they would make a dee-lish pie. And we were right.

You'll need pastry for a two-crust pie. See the ingredients and instructions in our recipe for our rhubarb and strawberry pie.

The Wonder Woman made rolled out the crust for this one. She had seen it done a couple of times so knew the techniques involved.

Another pie-making tip we learned from the Admiral Catnap (retired) was to prepare the filling ahead of time and store it in an airtight bag in the fridge. This makes rolling the pastry and assembing the pie very fast, as time is of the essence when working with pastry -- gotta keep it cold. And all that is required is to dump the contents of the bag into the pie. The process showed us how juicy the peaches were because the three hours in the fridge turned the mixture from just moist into pretty much a soupy consistency.

Makes one 9 inch pie.

Filling ingredients

  • 1 l (4 cups) of peeled, pitted and sliced peaches. See the tip below for how to peel peaches.
  • 180 ml (1 1/4 cups) white sugar
  • 60 g flour (1/2 cup) flour
  • 5 ml (1 tsp) of nutmeg or cinnamon, or a combination of the two
  • The juice of 1 lemon
  • 60 ml butter, in chunks
  • more white sugar, to sprinkle on the pie just after baking.


Put it together

Combine the peaches, sugar, flour, spice(s) and lemon juice.

After pouring the filling into the bottom crust, dot the chunks of butter on top.


Put the top crust in place and press the edges of the crust together with a fork. Slash holes in the top crust to allow steam to escape.


Bake in a 180 C (350 F) oven for 60 minutes. Be sure to place a cookie tray underneath to catch any drips. This can be very juicy and potentially very messy pie.


Place the pie on a rack to cool, and sprinkle white sugar on top while still hot for a sparkly look.

Once cooled enough to eat, tuck in.  Ice cream or whipped cream are good accompaniments. Yum!

Bow-Tie Calico gave a less predictable response.  She approved of the peaches but not, it seems, of the pie.


Tip: to peel the peaches


Prepare two large bowls of water, one boiling, the other ice water

On one end of the peach, cut an X in the skin

Put the peach into the boiling water for about 30 seconds

Move the peach to the ice water for at least 30 seconds. This stops any cooking that may have started.


Use a table knife or small sharp knife to peel the skin. It almost slides off by itself.

Ginger Sparkle Cookies


This is an old family favourite of mine, passed down from the Admiral Catnap (retired), same as the Strawberry-Rhubarb pie.  Well, not exactly the same recipe because I altered it a bit.  But don't worry, I will tell you both versions so you can make up your own mind whch to make.  Either way, you'll end up with a great tasting cookie that will disappear faster than you can say "thank you Admiral Catnap (retired)."

One of the main alterations to the Admiral's recipe is the addition of candied ginger.  Not just any will do, though.  We looked many places for ginger strong enough for the ginger taste to outweigh the sugar.  Turns out the bulk bins at a local supermarket had the best.  Here in the Calico Kitchen, we all love the taste of ginger.  And you don't need to worry about this overpowering the taste of the cookie because even the strongest candied ginger we found was subdued after combining with the rest of the ingredients.

Another change was omitting some sugar.  There was just too much in my opinion and even the revised recipe tastes very sweet.  But, take your choice.  It'll be fabulous either way.

Here are the ingredients for the modified recipe.


The dry ingredients:
  • 250g (2 cups) whole wheat flour
  • 2 ml (1/2 tsp) ground cloves
  • 5 ml (1 tsp) ground cinnamon
  • 5 ml (1 tsp) ground ginger
  • 10 ml (2 tsp) baking soda
  • 2 ml (1/2 tsp) salt

The wet ingredients:
  • 180 ml (3/4 cup) butter
  • 60 ml (1/4 cup) molasses
  • 1 egg

  • 375 ml (1 1/2 cups) candied ginger, chopped finely
  •  white granulated sugar in a bowl for rolling


The original recipe has the following changes:

  • Add 250 ml (1 cup) brown sugar, packed, to the wet ingredients
  • Use white flour instead of whole wheat
  • Omit the candied ginger


Directions

Preheat the oven to 180 C (375 F).

Mix the dry ingredients in a small bowl.

In a larger bowl, cream the wet ingredients together.

The wet ingredients after some mixing

Add the dry ingredients and the candied ginger to the wet ingredients and mix well. 


The dry ingredients added to the wet ingredients

This will get very thick.  This is OK.

After mixing.  Nice and thick with ginger chunks

Using your hands, shape the dough into 2 cm balls.  Then roll the balls in a bowl of granulated sugar -- this adds the sparkle!.  Place the balls on a cookie sheet lined with parchment paper.  Alternatively, you can grease a cookie sheet instead of using the parchment.  The cookies should be at least 5 cm apart.


Roll the balls in sugar

Use a fork to flatten the cookies.

Flattening the cookies on the baking sheet

Bake the cookies for 8 to 10 minutes.  After they're done, remove to a rack and cool slightly.

Makes about two dozen cookies.

If your house is anything like ours, these will disappear soon.  I had intended to take some to the office but there were none left the next day!

Next time, I'll double the recipe and see if that helps with having enough leftovers to share in the office.  But that's probably wishful thinking.

And what does Bow-Tie Calico think?  Well, see for yourself.

Approve!

Rhubarb-Strawberry Pie, Revisited


We enjoyed making and eating the original rhubarb and strawberry pie.  However, there's always room for improvement. Since we were visiting my parents, my mum, the Admiral Catnap (retired), was kind enough to give us a lesson on pie crust making.  Her tips included a new and better recipe for the pie crust even though the original recipe came from her.


Fab strawberries


We didn't set out specifically to remake rhubarb and strawberry, but the local produce stand had some delish local strawberries along with some fresh rhubarb so our choice was made for us.


The Crust

This makes enough for two crusts in a 25 cm (9 in) pie plate.  Changed from before are the amount and type of flour and the amount of the baking powder.
  • 125 ml (1/2 cup) unsalted butter
  • 125 ml (1/2 cup) vegetable shortening
  • 250 g (2 cups) flour. (formerly 180 g of flour.  We used all-purpose white flour this time.)
  • 2 ml (1/2 tsp) salt
  • 5 ml (1 tsp) baking powder (formerly 10 ml)
  • ice water, up to 60 ml (1/4 cup)


Here's how we did it.

  1. Slice the shortening and butter into small pieces.  Put them on a plate and pop it into the freezer for a couple of hours.


    Add butter and shortening to the flour
  2. Mix the flour, salt and baking powder together in a bowl.
  3. Add the butter and shortening. Use a pastry cutter to "cut" the butter and shortening into the dry mixture. The idea is to cut up the butter and shortening into small bits that are then coated with flour. If you don't have a pastry cutter, then use two table knives in a scissor motion. It'll take longer but the result will be just as good.


    Add ice water

  4. Once the mixture resembles coarse meal, then add ice water, 15 ml at a time until the mixture barely holds together when you form it into two balls, one for each crust.  It's important to handle the pastry as little as possible at this point.  The Admiral says that even flattening the ball now is handling it too much.  It's better to start shaping the ball after the next step.
  5. Wrap the pastry in plastic wrap and put into the fridge for two hours or overnight.
  6. Take a ball of pastry and flatten it. Roll it out on a floured surface into a circle with your favourite rolling pin. Use flour to prevent it from sticking, or, sprinkle more water on the dough if it's too dry to hold together.
    Form into balls
  7. When rolling the dough, turn it occasionally to keep it from sticking to the surface.  This makes it easier to lift later.  And it also helps keep it round.
  8. When it's the right size, transfer to a pie plate. Another tip for moving the crust is to roll it around the rolling pin, including the wax paper, and unroll it on the pie plate.
  9. Don't worry about shaping the crust at this point, and don't worry about filling in any small holes that may have formed.  No one will see the bottom crust.  Use a table knife to cut off any excess pastry and save it for decorating the pie after the top crust is in place.
    The dough is ready for the fridge


  10. Add your favourite filling.  We had already chopped and combined the ingredients into a plastic bag so all we had to do was dump the contents into the pie plate.
  11. Roll out the other crust and put on top. Fold the edges back on itself to form a nice ridge all around.
  12. Use a fork or a similar item to press around the edges in a nice pattern. Use a sharp knife to slash the top crust to let steam escape.


Pastry tips:
  • Notice that everything should be cold -- the butter, shortening and water. This is to prevent the flour from dissolving into the butter and shortening. This way, it's a much lighter and flakier crust.
  • Handle the dough as little as possible. This also is to prevent the flour from dissolving into the butter and make it light and flaky.
  • Use a marble slab for rolling if you can. That also keeps everything cool.
  • The Admiral says that although you should only add as little as possible ice water to the dough, she's never seen any harm from too much water.
  • If you are using a recipe that calls for a baked crust, then bake for 15 to 20 minutes at 190 C (350 F). Before baking, poke some holes in the pastry with a fork to keep it from puffing up too much.


The Filling

The only change from before is the addition of the pat of butter.
  • 1 l (4 cups) of rhubarb and/or strawberries. It should be washed and sliced into 2 cm (1 inch) lengths. In our case for the revisited pie, we used 250 ml of rhubarb and 750 ml of strawberries
  • 190 ml (3/4 cup) sugar
  • 60 ml (1/4 cup) flour
  • 5 ml (1 tsp) ground cinnamon
  • A large pat of butter, about 60 ml


Here's how to put it together.
Ready to transfer the top crust
  1. Preheat the oven to 190 C (350 F)
  2. Place the rhubarb, and strawberries if you're using them, in a bowl. Mix the flour, sugar and cinnamon and pour over the rhubarb. Toss gently to coat everything
  3. Pour the filling mixture into the pie plate on top of the bottom crust
  4. Place a large pat of butter on top of the filling, in the centre
  5. Put the top crust onto the filling and shape (see above)
  6. Bake for 45 minutes. Put a cookie sheet under the pie to keep your oven clean. This will get juicy!
  7. Remove from the oven and place onto a rack to cool. Just after removing, sprinkle the top with sugar to make it sparkle 
  8. You can freeze the unbaked pie.  If you do, increase the baking time to 60 minutes.

Before baking


Once it's cooled enough, slice and serve!  Optionally, serve with whipped cream or ice cream.

Just right

Sharp-eyed readers will notice that this isn't Bow-Tie Calico, as Bow-Tie didn't come with us on vacation.  However, her uncle, Able Seaman Catnap, consented to approve the pie instead!


Yum!