
We enjoyed making and eating the original rhubarb and strawberry pie. However, there's always room for improvement. Since we were visiting my parents, my mum, the Admiral Catnap (retired), was kind enough to give us a lesson on pie crust making. Her tips included a new and better recipe for the pie crust even though the original recipe came from her.
 |
| Fab strawberries |
We didn't set out specifically to remake rhubarb and strawberry, but the local produce stand had some delish local strawberries along with some fresh rhubarb so our choice was made for us.
The Crust
This makes enough for two crusts in a 25 cm (9 in) pie plate. Changed from before are the amount and type of flour and the amount of the baking powder.
- 125 ml (1/2 cup) unsalted butter
- 125 ml (1/2 cup) vegetable shortening
- 250 g (2 cups) flour. (formerly 180 g of flour. We used all-purpose white flour this time.)
- 2 ml (1/2 tsp) salt
- 5 ml (1 tsp) baking powder (formerly 10 ml)
- ice water, up to 60 ml (1/4 cup)
Here's how we did it.
- Slice the shortening and butter into small pieces. Put them on a plate and pop it into the freezer for a couple of hours.

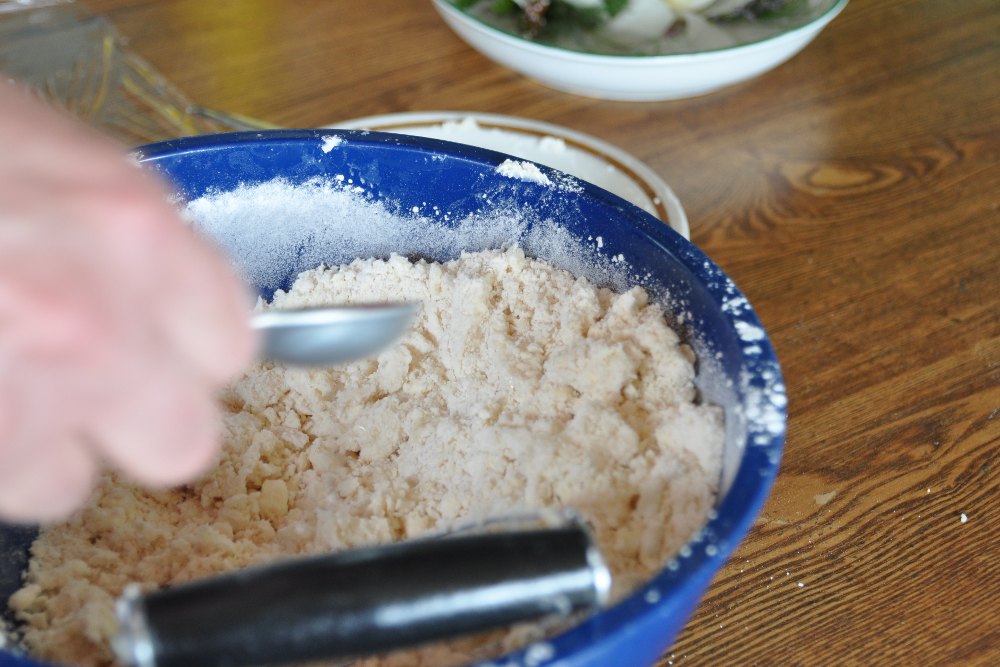
Add butter and shortening to the flour - Mix the flour, salt and baking powder together in a bowl.
- Add the butter and shortening. Use a pastry cutter to "cut" the butter and shortening into the dry mixture. The idea is to cut up the butter and shortening into small bits that are then coated with flour. If you don't have a pastry cutter, then use two table knives in a scissor motion. It'll take longer but the result will be just as good.

Add ice water
- Once the mixture resembles coarse meal, then add ice water, 15 ml at a time until the mixture barely holds together when you form it into two balls, one for each crust. It's important to handle the pastry as little as possible at this point. The Admiral says that even flattening the ball now is handling it too much. It's better to start shaping the ball after the next step.
- Wrap the pastry in plastic wrap and put into the fridge for two hours or overnight.
- Take a ball of pastry and flatten it. Roll it out on a floured surface into a circle with your favourite rolling pin. Use flour to prevent it from sticking, or, sprinkle more water on the dough if it's too dry to hold together.

Form into balls - When rolling the dough, turn it occasionally to keep it from sticking to the surface. This makes it easier to lift later. And it also helps keep it round.
- When it's the right size, transfer to a pie plate. Another tip for moving the crust is to roll it around the rolling pin, including the wax paper, and unroll it on the pie plate.
- Don't worry about shaping the crust at this point, and don't worry about filling in any small holes that may have formed. No one will see the bottom crust. Use a table knife to cut off any excess pastry and save it for decorating the pie after the top crust is in place.

The dough is ready for the fridge
- Add your favourite filling. We had already chopped and combined the ingredients into a plastic bag so all we had to do was dump the contents into the pie plate.
- Roll out the other crust and put on top. Fold the edges back on itself to form a nice ridge all around.
- Use a fork or a similar item to press around the edges in a nice pattern. Use a sharp knife to slash the top crust to let steam escape.


Pastry tips:
- Notice that everything should be cold -- the butter, shortening and water. This is to prevent the flour from dissolving into the butter and shortening. This way, it's a much lighter and flakier crust.
- Handle the dough as little as possible. This also is to prevent the flour from dissolving into the butter and make it light and flaky.
- Use a marble slab for rolling if you can. That also keeps everything cool.
- The Admiral says that although you should only add as little as possible ice water to the dough, she's never seen any harm from too much water.
- If you are using a recipe that calls for a baked crust, then bake for 15 to 20 minutes at 190 C (350 F). Before baking, poke some holes in the pastry with a fork to keep it from puffing up too much.
The Filling
The only change from before is the addition of the pat of butter.
- 1 l (4 cups) of rhubarb and/or strawberries. It should be washed and sliced into 2 cm (1 inch) lengths. In our case for the revisited pie, we used 250 ml of rhubarb and 750 ml of strawberries
- 190 ml (3/4 cup) sugar
- 60 ml (1/4 cup) flour
- 5 ml (1 tsp) ground cinnamon
- A large pat of butter, about 60 ml
Here's how to put it together.
 |
| Ready to transfer the top crust |
- Preheat the oven to 190 C (350 F)
- Place the rhubarb, and strawberries if you're using them, in a bowl. Mix the flour, sugar and cinnamon and pour over the rhubarb. Toss gently to coat everything
- Pour the filling mixture into the pie plate on top of the bottom crust
- Place a large pat of butter on top of the filling, in the centre
- Put the top crust onto the filling and shape (see above)
- Bake for 45 minutes. Put a cookie sheet under the pie to keep your oven clean. This will get juicy!
- Remove from the oven and place onto a rack to cool. Just after removing, sprinkle the top with sugar to make it sparkle
- You can freeze the unbaked pie. If you do, increase the baking time to 60 minutes.
 |
| Before baking |
Once it's cooled enough, slice and serve! Optionally, serve with whipped cream or ice cream.
 |
| Just right |
Sharp-eyed readers will notice that this isn't Bow-Tie Calico, as Bow-Tie didn't come with us on vacation. However, her uncle, Able Seaman Catnap, consented to approve the pie instead!
 |
| Yum! |


