Cats, Cooking, and Life!
Showing posts with label strawberry. Show all posts

Rhubarb-Strawberry Pie, Revisited


We enjoyed making and eating the original rhubarb and strawberry pie.  However, there's always room for improvement. Since we were visiting my parents, my mum, the Admiral Catnap (retired), was kind enough to give us a lesson on pie crust making.  Her tips included a new and better recipe for the pie crust even though the original recipe came from her.


Fab strawberries


We didn't set out specifically to remake rhubarb and strawberry, but the local produce stand had some delish local strawberries along with some fresh rhubarb so our choice was made for us.


The Crust

This makes enough for two crusts in a 25 cm (9 in) pie plate.  Changed from before are the amount and type of flour and the amount of the baking powder.
  • 125 ml (1/2 cup) unsalted butter
  • 125 ml (1/2 cup) vegetable shortening
  • 250 g (2 cups) flour. (formerly 180 g of flour.  We used all-purpose white flour this time.)
  • 2 ml (1/2 tsp) salt
  • 5 ml (1 tsp) baking powder (formerly 10 ml)
  • ice water, up to 60 ml (1/4 cup)


Here's how we did it.

  1. Slice the shortening and butter into small pieces.  Put them on a plate and pop it into the freezer for a couple of hours.


    Add butter and shortening to the flour
  2. Mix the flour, salt and baking powder together in a bowl.
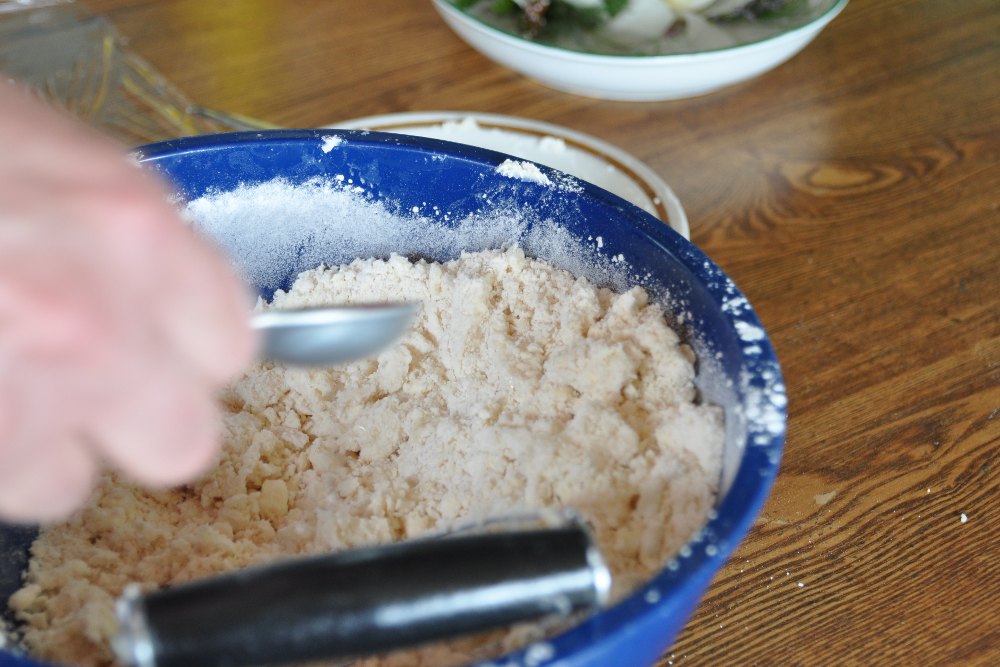
  3. Add the butter and shortening. Use a pastry cutter to "cut" the butter and shortening into the dry mixture. The idea is to cut up the butter and shortening into small bits that are then coated with flour. If you don't have a pastry cutter, then use two table knives in a scissor motion. It'll take longer but the result will be just as good.


    Add ice water

  4. Once the mixture resembles coarse meal, then add ice water, 15 ml at a time until the mixture barely holds together when you form it into two balls, one for each crust.  It's important to handle the pastry as little as possible at this point.  The Admiral says that even flattening the ball now is handling it too much.  It's better to start shaping the ball after the next step.
  5. Wrap the pastry in plastic wrap and put into the fridge for two hours or overnight.
  6. Take a ball of pastry and flatten it. Roll it out on a floured surface into a circle with your favourite rolling pin. Use flour to prevent it from sticking, or, sprinkle more water on the dough if it's too dry to hold together.
    Form into balls
  7. When rolling the dough, turn it occasionally to keep it from sticking to the surface.  This makes it easier to lift later.  And it also helps keep it round.
  8. When it's the right size, transfer to a pie plate. Another tip for moving the crust is to roll it around the rolling pin, including the wax paper, and unroll it on the pie plate.
  9. Don't worry about shaping the crust at this point, and don't worry about filling in any small holes that may have formed.  No one will see the bottom crust.  Use a table knife to cut off any excess pastry and save it for decorating the pie after the top crust is in place.
    The dough is ready for the fridge


  10. Add your favourite filling.  We had already chopped and combined the ingredients into a plastic bag so all we had to do was dump the contents into the pie plate.
  11. Roll out the other crust and put on top. Fold the edges back on itself to form a nice ridge all around.
  12. Use a fork or a similar item to press around the edges in a nice pattern. Use a sharp knife to slash the top crust to let steam escape.

Pastry tips:
  • Notice that everything should be cold -- the butter, shortening and water. This is to prevent the flour from dissolving into the butter and shortening. This way, it's a much lighter and flakier crust.
  • Handle the dough as little as possible. This also is to prevent the flour from dissolving into the butter and make it light and flaky.
  • Use a marble slab for rolling if you can. That also keeps everything cool.
  • The Admiral says that although you should only add as little as possible ice water to the dough, she's never seen any harm from too much water.
  • If you are using a recipe that calls for a baked crust, then bake for 15 to 20 minutes at 190 C (350 F). Before baking, poke some holes in the pastry with a fork to keep it from puffing up too much.


The Filling

The only change from before is the addition of the pat of butter.
  • 1 l (4 cups) of rhubarb and/or strawberries. It should be washed and sliced into 2 cm (1 inch) lengths. In our case for the revisited pie, we used 250 ml of rhubarb and 750 ml of strawberries
  • 190 ml (3/4 cup) sugar
  • 60 ml (1/4 cup) flour
  • 5 ml (1 tsp) ground cinnamon
  • A large pat of butter, about 60 ml


Here's how to put it together.
Ready to transfer the top crust
  1. Preheat the oven to 190 C (350 F)
  2. Place the rhubarb, and strawberries if you're using them, in a bowl. Mix the flour, sugar and cinnamon and pour over the rhubarb. Toss gently to coat everything
  3. Pour the filling mixture into the pie plate on top of the bottom crust
  4. Place a large pat of butter on top of the filling, in the centre
  5. Put the top crust onto the filling and shape (see above)
  6. Bake for 45 minutes. Put a cookie sheet under the pie to keep your oven clean. This will get juicy!
  7. Remove from the oven and place onto a rack to cool. Just after removing, sprinkle the top with sugar to make it sparkle 
  8. You can freeze the unbaked pie.  If you do, increase the baking time to 60 minutes.

Before baking


Once it's cooled enough, slice and serve!  Optionally, serve with whipped cream or ice cream.

Just right

Sharp-eyed readers will notice that this isn't Bow-Tie Calico, as Bow-Tie didn't come with us on vacation.  However, her uncle, Able Seaman Catnap, consented to approve the pie instead!


Yum!

Ichigo Daifuku

Ichigo daifuku is a Japanese dessert with
strawberry and anko.   It is a strawberry coated in sweet red bean paste and then coated again in starchy pastry.  The balls are rolled in corn starch to prevent them sticking together or to your fingers.

This is a commonly available in Japanese bakeries.  We first tried it in a small bakery in a train station in Tokyo.  They're a bit finicky to make because they're sticky but look gorgeous and taste divine.  They are supposed to bring good luck to all those who eat them.


Ingredients
  • 6 fresh strawberries, small to medium size
  • 150 g (5.29 oz) anko - sweet red bean paste
  • 100 g (3.53 oz) mochiko - glutinous rice flour
  • 30 ml (2 tbsp) white sugar
  • 100 ml (1/2 cup) water
  • corn starch
Directions
  1. Wash the strawberries and slice off the leaves.
  2. Divide the anko in half then separate each half into three. Altogether, there should be six even portions. Roll each portion into a ball.
  3. Flatten the ball into a circle and place the strawberry with its tip touching the anko. Gently, mould the anko upwards to completely cover the strawberry. Set the balls aside and cover with plastic wrap over to preserve moisture.
  4. Set the steamer on middle-heat setting.  Wrap a clean kitchen towel around the cover as this will prevent water dripping on to the balls.
  5. Add glutinous rice flour and sugar into a NON-STICK bowl. With a spatula, stir while gradually adding water. Make sure there are no clumps of rice flour left before steaming the mochi mixture.
  6. Place the bowl and dough inside the steamer. Turn the heat up to high and let it steam for 15 minutes.
  7. Meanwhile, dust the baking sheet with corn starch and leave the corn starch close by for later.
  8. Carefully, remove the hot bowl from the steamer with a towel. Wet the spatula with water to help scrape down the sides and also the bottom of the bowl for the mochi to shape into a ball.
  9. Drop the mochi on to the baking sheet then sprinkle some corn starch on top. Coat your hands with corn starch before handling the sticky mochi.
  10. Like the anko, twist to separate the
    mochi into six even pieces then roll each piece into a ball. Tip: Dab corn starch on the sticky ends to prevent sticking together after each twist.
  11. Flatten the mochi ball and dust off corn starch on one side with a brush. Place the anko-covered strawberry on the dusted side then the mould the mochi upwards around the anko. Twist off the mochi at the top to secure it.
  12. Refrigerate until serving time.
  13. Dust off excess corn starch on the ichigo daifuku with a brush before serving

Bow-tie Calico approves with a tongue lick!


Rhubarb-Strawberry Pie


Here's an old family favourite for me: rhubarb and strawberry pie! Yet another dessert that is so bad for you but oh-so-good for your nose and tastebuds. For Wonder Woman and Da Original Gangstur, though, it's a new family favourite. That's because it's the first time either of them has tasted rhubarb.

Fresh rhubarb is fairly seasonal as it is a spring crop. Rhubarb is also available in the frozen vegetable section of most grocery stores so don't get discouraged if fresh is not around. Frozen is pretty much as good as fresh when in a pie as it's smothered in sugar and pastry. For us, I bought too much and put the rest into the freezer for later.

Rhubarb is an unusual vegetable. It's the stem of a leaf but don't eat the leaf as it's not good for you. It looks a little like celery but tastes so much different. The plants are generally grown in the dark to make the plant grow taller quicker to help the leaves find sunlight. The colour varies from red to green and all shades in between, but there's no difference in taste.

Because rhubarb is so sour and tart, this recipe uses lots of sugar to balance the taste to perfection. It makes just the right amount of tang in your mouth. After tasting the pie, Da Original Gangstur asked "Is this apple pie?" That's probably because of the added cinnamon.


The Pastry

This will make two crusts for a 25 cm (9 inch) pie plate, either for a single two-crust pie, or two single-crust pies. In our case, this is a two-crust pie so this makes enough for one pie.


  • 180g (1 and 1/2 cups) flour. We use whole-wheat flour, though all-purpose white works too.
  • 2 ml (1/2 tsp) salt
  • 10 ml (2 tsp) baking powder
  • 125 ml (1/2 cup) unsalted butter, chilled
  • 125 ml (1/2 cup) vegetable shortening, chilled
  • ice water, up to 60 ml (1/4 cup)


  1. Mix the flour, salt and baking powder together in a bowl.
  2. Add the butter and shortening. Use a pastry cutter to "cut" the butter and shortening into the dry mixture. The idea is to cut up the butter and shortening into small bits that are then coated with flour. If you don't have a pastry cutter, then use two table knives in a scissor motion. It'll take longer with the knives but the result will be just as good.
  3. Once the mixture resembles coarse meal, then add the ice water, 15 ml (1 tbsp) at a time until the mixture holds together when you form it into a ball.
  4. Wrap the ball of pastry in wax paper and put into the fridge for two hours or overnight.
  5. Split the ball into two and put one of the halves back into the fridge. Roll it out on a floured surface into a circle with your favourite rolling pin. You may want to roll it on top of a sheet of wax paper to make it easier to move into the pie plate.
  6. Once it's rolled out to the right size, transfer it to a greased pie plate. Another tip for moving the crust is to roll it around the rolling pin, including the wax paper, and unroll it on the pie plate.
  7. Shape around the edges to make it look nice.
  8. After the pie is filled (see below), roll out the other crust and put on top. Fold the edges back on itself to form a nice ridge all around.
  9. Use a fork or a similar item to press around the edges in a nice pattern. Use a sharp knife to slash the top crust to let steam escape.


Pastry tips:

  • Notice that everything should be cold -- the butter, shortening and water. This is to prevent the flour from dissolving into the butter and shortening. This way, it's a much lighter and flakier crust.
  • Handle the dough as little as possible. This also is to prevent mixing and make it light and flaky.
  • Use a marble slab for rolling if you can. That also keeps everything cool.
  • If you are using a recipe that calls for a baked crust, then bake for 15 to 20 minutes at 190C (350F). Before baking, poke some holes in the pastry with a fork to keep it from puffing up too much.


The Filling

  • 1 l (4 cups) of rhubarb. It should be washed and sliced into 2 cm (1 inch) lengths. In our case, we use 750 ml of rhubarb and 250 ml of strawberries
  • 190 ml (3/4 cup) sugar
  • 60 ml (1/4 cup) flour
  • 5 ml (1 tsp) ground cinnamon


  1. Preheat the oven to 190C (350F)
  2. Place the rhubarb, and strawberries if you're using them, in a bowl. Mix the flour, sugar and cinnamon and pour over the rhubarb. Toss gently to coat everything.
  3. Pour the filling mixture into the pie plate on top of the bottom crust. Put the top crust onto the filling and shape (see above).
  4. Bake for 60 minutes. Put a cookie sheet under the pie to keep your oven clean. This will get juicy!
  5. Remove from the oven and place onto a rack to cool. Just after removing, sprinkle the top with sugar for a nice sparkly look.


When you can wait no longer, slice and serve. Ice cream or whipped cream are great accompaniments and it's also good by itself.

Tip: after washing and slicing the rhubarb, pop any extra into a freezer bag and freeze for later.


Does Bow-Tie Calico approve? She does!

Cheesecake Fruit Flan

For other desserts we tried to make healthier alternatives to some standard dishes. But in a complete turn-around, we proudly present today's dish, one that's pretty much as bad for you as anything else you care to make. Sure, we cut the sugar and used whole-wheat flour instead of white. Plus we have real fruit. But that's not going to make up for all the fat and calories that we left in.

Still, it tastes great and is easy to make. And it looks divine. Should we do it? Da Original Gangstur says "yea!"

This recipe makes enough for a rectangular flan pan that's about 25 x 40 cm (10 x 15 inches), which is a fairly large pan. We cut the quantities by about a third for our smaller pan that is about 25 cm in diameter.


Ingredients

Crust
  • 500 g (2 cups) whole-wheat flour
  • 2 ml (1/2 tsp) cream of tartar
  • 10 ml (2 tsp) baking soda
  • 125 ml (1/2 cup) icing sugar
  • 125 ml (1/2 cup) butter
  • 125 ml (1/2 cup) vegetable oil
  • 1 egg
  • 2 ml (1/2 tsp) vanilla extract
Filling
  • 250 g (8 oz) package cream cheese, softened
  • 30 ml (2 tbsp) white sugar
  • 2 ml (1/2 tsp) vanilla extract
Fruit toppings
  • Just about any kind of fruit you want. We used strawberries, blackberries, a kiwi and an apricot. Also good are other kinds of berries, mandarin segments and even banana slices. Try to get an assortment of colours so it will look yummay.
Glaze
  • 15 ml (1 tbsp) cornstarch
  • 30 ml (2 tbsp) white sugar
  • 125 ml (1/2 cup) water
  • 125 ml (1/2 cup) orange juice
  • The juice of half a lemon

Directions
  1. Preheat oven to 175 C (350 F). Grease the pan with butter.
  2. Crust: in one bowl, sift together flour, cream of tartar and the baking soda. In a larger bowl, cream together the sugar, butter, oil, egg, and vanilla. Add the dry ingredients to the wet ingredients and blend well. Spread the dough evenly on the bottom of the greased pan. Bake until golden brown, 10 to 12 minutes. Put the pan on a rack and cool to room temperature.
  3. Filling: cream together the cream cheese, sugar, and vanilla. Spread on the cooled crust.
  4. Fruit toppings: slice and arrange the fruit on the flan.
  5. Glaze: mix the sugar and cornstarch in a small saucepan. Add the water, orange juice and lemon juice. On medium heat, boil slowly for one minute. Remove from heat and cool to room temperature. Spoon or brush the glaze evenly over the fruit.
  6. Refrigerate until ready to serve.

And Bow-Tie Calico approves. Of course she does.